How to curve, warp and twist a pixel stretch
By Emre Ertunc · Published July 10, 2026 · Updated August 7, 2026 · 6 min read
A straight pull gets the effect onto the photo. The shape comes from what you do next. A few deliberate control points can turn a flat stripe into a ribbon that bends around the picture instead of sitting on top of it.
How do you curve a pixel stretch?
Press and drag the arrow on the sampling bar instead of tapping it, and the ribbon follows the route you sketch. Once it exists, the blue control points bend the centerline, and tapping the line adds another point. Warp then widens or narrows individual sections without changing the path itself.
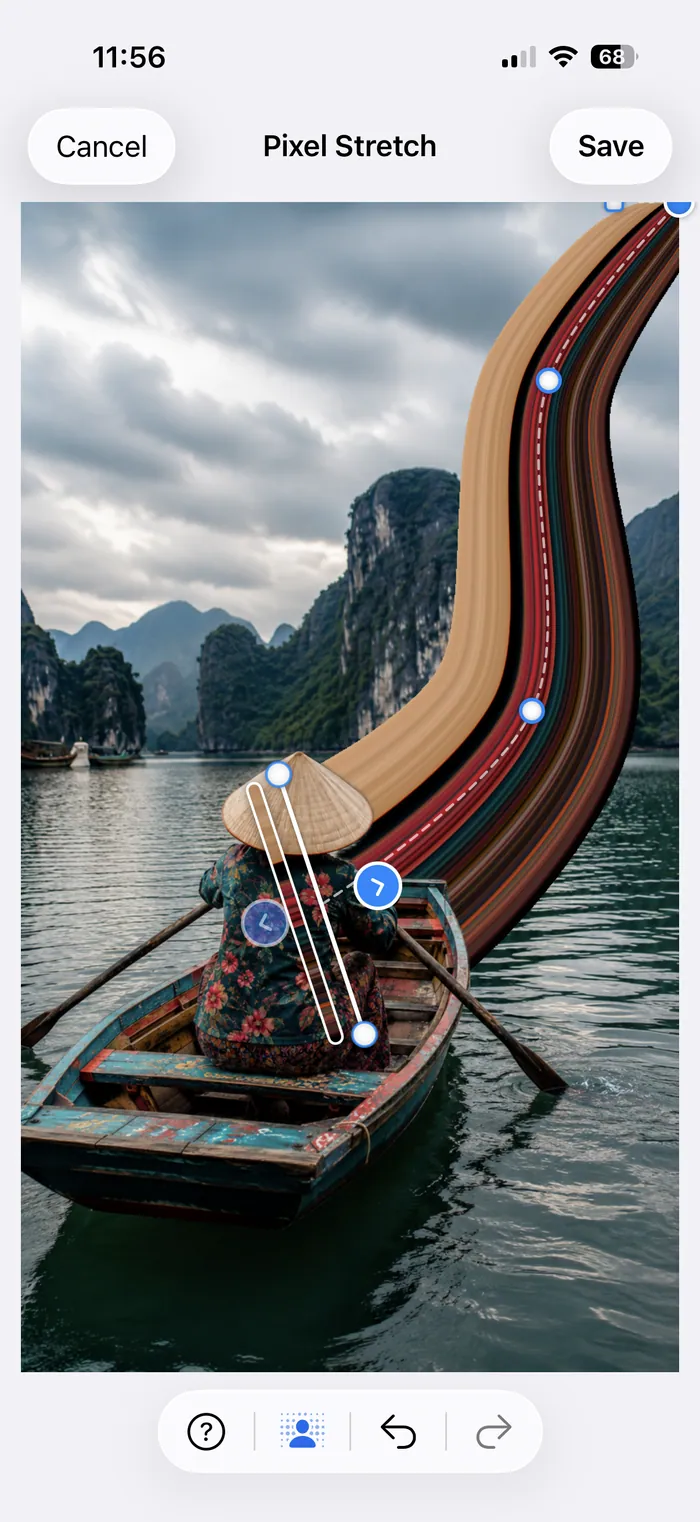
Pixel Stretch Pro gives the ribbon a centerline you can draw and edit. The blue points shape that path in either mode. Shape leaves the finishing twist free, while Warp adds independent width controls to the interior points and keeps the finishing twist within a smaller range. The cleanest edits usually use a little of each rather than pushing one control to an extreme.
When the route should be geometric rather than hand-drawn, Presets can turn the same path into a controlled Round arc or a balanced S Curve. Shape and Warp remain available for the parts you still want to adjust by eye.
Tap for straight, drag for a curve
The sampling bar has an arrow on each side. Tap an arrow and the app makes a straight stretch in that direction. Press and drag the arrow instead and you can sketch the route yourself. That first gesture sets the rhythm, but it is not permanent: the blue points that appear afterwards are there so you can correct it.
Build the curve in six moves
Choose a useful strip of color
Move and rotate the sampling bar until it crosses the colors you want, ideally where the subject meets open background. A striped jacket, painted car, or bright sail gives the ribbon more detail than a flat grey surface.
Pull toward open space
Tap for a straight start or drag the arrow along the route you want. Give the ribbon somewhere to go. Pulling through a face, sign, or other focal point creates work you then have to undo.
Move the blue points
Drag the control points to settle the centerline into one clear arc or a gentle S-curve. Tap the line when you genuinely need another point. More points are useful for a tight route, not as decoration.
Shape the finish
Use the end control to taper the ribbon, fan it wider, or twist the finishing line. Choose Shape when the finish needs a free, full twist. A narrow finish feels fast; a wider one feels more like paint spreading across the frame.
Warp only where it helps
Switch to Warp and pull the orange handles around an interior point to widen or narrow that part of the ribbon. Use it to clear the subject, fill an empty corner, or give a bend more weight without changing the whole path.
Tune the edge, then compare
Open Adjustments for Edge hue and Opacity. Check the result against the original before saving a high-resolution copy. If the effect wins only because it is louder, pull it back.
Shape and Warp are not the same tool
Move the blue points in either mode when the centerline is wrong. Both modes let you set the finishing width and angle, but Shape allows a free finishing twist. Warp adds orange handles to the interior points and keeps the finish within a smaller twist range. The two sides of an interior point move independently, so one edge can make room for the subject while the other fills the background.
A good order is path first, width second, color last. Adjusting everything at once makes it hard to tell which change actually improved the photo.
What Edge hue and Opacity actually do
- Edge hue adds a soft colored fringe around the ribbon's outside edges. It is useful when the strip needs separation from a similar background, but it does not replace the colors sampled from the photo.
- Opacity blends the ribbon back into the original image. Lower it for water, sky, or a quiet portrait; keep it stronger when paint, lights, or patterned clothing are meant to carry the picture.
Why a curved stretch starts to look lumpy
- Too many control points. Start with the fewest points that can hold the curve, then add one only where the route changes.
- A hard turn immediately after the bar. Let the ribbon leave the subject cleanly before asking it to bend.
- Every section has the same width. A small taper or one wider bend gives the ribbon depth.
- The finish is over-twisted. Twist is strongest when it reads as a final turn, not a knot.
- The sampled strip has no color variation. Move the bar before rebuilding the whole curve.
Use Compare to hold the original on screen, and use undo or redo freely while the shape is still moving. For the basic workflow before these controls, start with How to make the pixel stretch effect.
Frequently asked
What is the difference between Shape and Warp?
Blue points shape the path in either mode. Shape allows a free finishing twist. Warp adds independent width controls to interior points and limits the finish to a smaller twist range.
Does Warp change the person or object in the photo?
No. Warp changes the stretched ribbon. Smart Subject, when available, is the separate control that keeps a detected subject in front of it.
How many control points does a curve need?
Fewer than most people use. One long arc often needs no extra points at all, and a proper S-curve needs two. Add a point only where the route genuinely changes direction, because every extra point is another place the ribbon can develop a kink.
What does the twist control do?
Twist rotates the finishing line of the ribbon, so the end reads as a final turn rather than a flat cut. In Shape mode the twist is free, which suits a dramatic finish. In Warp mode it stays within a smaller range so the width controls keep their shape.
Can a pixel stretch make a full circle?
Yes, through the Round preset. It converts your existing path into a circular guide that can run from a shallow arc all the way to a complete 360 degree loop, with handles for its size, direction, and how far around it travels.
What does Edge hue actually change?
Edge hue adds a soft colored fringe along the outside edges of the ribbon. It is a separation tool: use it when the stretch and the background sit too close in tone. It does not recolor the strip you sampled from the photo.